In the prior post in this series I went through creating the actual POI file using ITN Converter. In this post I am going to show you how to make that file actually useful for something… like finding locations with your GPS!
Open the Magellan POI Editor. Then open the .CSV file you previously created. As shown in (13) select .CSV since that is what you created last time (or should have). Select the file you created in (14), and then click on Open (15).
You did download the Magelan POI Editor from the earlier post…. correct? *Sigh*
Here it is again….
Download Magellan POI Editor – UPDATE 12/14/2015 this pointed to a link that was no longer valid so I removed it.
Small and portable it can be used in the car or stuck in a pocket for pedistrian use – like walking around Disney World! (Batteries are supposed to be good for 3 hours or so.)
Okay, now that you downloaded the POI Editor, and know where it is at, go ahead and open the Magellan POI Editor. Then open the .CSV file you previously created. As shown in (13) select file type of .CSV since that is what you created last time (or should have). Select the file you created in (14), and then click on Open (15).
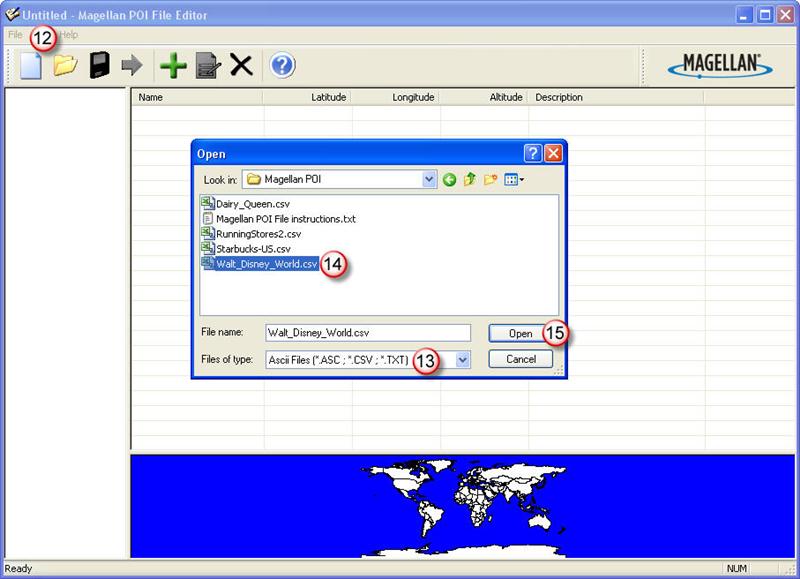
Use the dialog box to browse to the .CSV file you previously created.

The software will automatically open the Import Wizard when it sees you open a .CSV file. Unless you have a “header” line that you saved (it the view window it would probably look different than the other data shown.) You should leave the “Start Importing from line = 1, set to 1. Some downloaded files have several rows of information about where the file came from, what’s included, who made it, etc. so you may need to change this to line 2, 3, or ?
Change the “Separator” check box to “Comma” (unless you are sure it is different – which you should be able to tell by looking at the entries below that box… what character is between the entries (17) – that is what you specify.)

Select the proper data for each of the three columns. Normally in North America the data with the “-” sign will be the Latitude, the other is the Longitude and the final column is the “Name”. If you do not pick these three specific titles for the columns you will get an erro saying “The Latitude, Longitude and Name are required fields” but it doesn’t tell you which one is wrong.. but hey, there are only three you aren’t that dumb are you? You CAN reverse the Latitude and Longitude easily enough, and it will let you. But in the next step when you see all your POI’s floating out in the ocean or in Antartica somewhere you may just realize what you did.
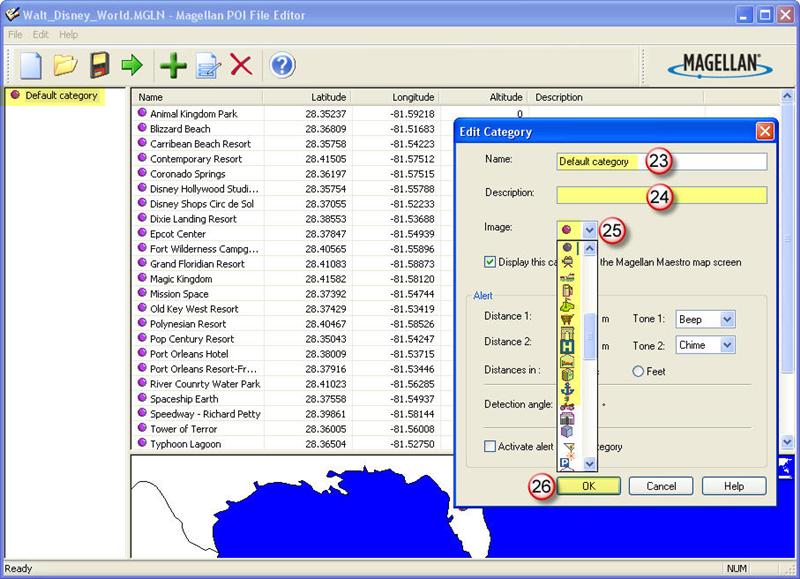
Fixing up the POI file to look nice. Your new file should now appear! Hooray!! Click on the title in the left pane, if may be some boring “default category” name and who want’s to see that in their GPS?
Double click on the name and a new window will open. Change the “Name” (23) to whatever you like. This will later be the category in the GPS you select in your “Enhanced POI” file. You can add a description (24) (not sure where this may show up, but might remind you when it was created, updated etc. if you come back to the file to edit it later.) Then pick an icon that you like to represent the category and individual entries. (25) Then when everything in the categoy looks good click the OK button (26).
NOTE: You can also set the other options that are shown here. The “Alerts” are cool, if you come within the distance you select here the GPS alarm (that you select) goes off notifying you that you are near to one of the POI’s in this file… even if it is not the one you have choosen for a route at the time. This is sort of cool, and then becomes sort of annoying. Maybe I need to revisit these setting in the file I made for my company’s factories… While I am driving to dinner, to the hotel, to the bar to the strip show oh, business meeting it keeps announcing I am near the site, and it does this for each distance set.. so it can be gonging constantly as I drive around. That’s when I usually hit the “Mute” button and silence Ms. Magellan (Oh yeah, my GPS is absolutely a gabby old woman, no doubt about it! This is also evident when I try to use voice commands since she constantly ignores me no matter what “tone of voice I use with her” seems to get a response!)
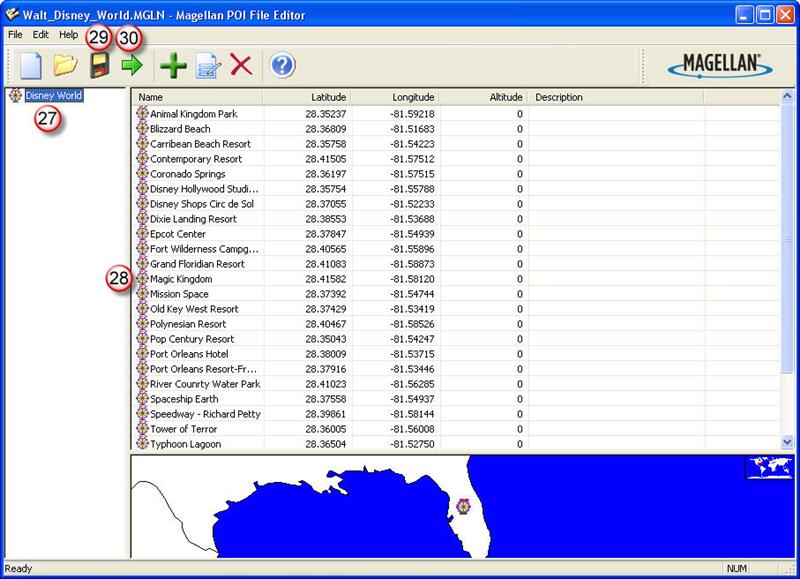
Take a final look at the new file, the Category should be what you created and like, (27) and all the points you added should be in the right window. (28) Now you jsut need to save the file (29) to a place you know you can find again. (Maybe the same place the .CSV file is saved.)
If you are ready, hook up your GPS using the USB cable, give it time for the system to recognize it… I normally get the window that pops up asking me “What do you want to do”, which I then cancel. Click on the Green Arrow to “Transfer” and it should take just a few seconds to complete the process.
Unhook the GPS from the USB, turn it on, and see if you can find your fantastic new GPS waypoints!
In mine:
- Make sure any current routes are cancelled
- Point of Interest
- Enhanced
- Category
- Disney Rocks!
- The select “Nearest” (for Starbucks and Dairy Queen!) or select the name of the point you want “Disney Epcot Center”.
Drive there and have fun whether it is eating, drinking or being amused.
Save that .CSV file!
Save that .CSV file! Whatever you do make sure you save the original .CSV file that you used to create this Magellan .MGLN file using the Magellan POI File Editor. If you ever want to go back and add more points you will want the original .CSV file to use with the ITN Converter program. It cannot open the proprietary Magellan .MGLN format. Your only choices are to add points using the Magellan program and adding them manually one at a time, or starting completely over creating a new .CSV file. (Updated… not true see post on how to convert .MGLN back to csv.)
Now, what I don’t like about Magellan POI Editor:
- Limited inputs – the unit has many other fields that are useful if they are filled out.
- Phone Number
- Street Address
- The unit has bluetooth and syncs with phone, but without phone numbers it does not work. To have to manually enter the phone numbers in using the unit is time consuming.. why not let me add them in the software and upload it all to the unit?
- It will only save your information in the .MGLN format.
- If you make edits to any of the entries you lose that information if you update the .CSV files later. This forces you to always edit the .CSV file and upload it. Also, if you delete the .CSV file you are totally screwed since you cannot open the .MGLN file and edit it. Oh, maybe with a lot of work you could strip out all the junk and get it back to a state you can use, but if the POI Editor allowed you to save the file as a .CSV it would make life so much easier.
(Updated… not true see post on how to convert .MGLN back to csv.)
Until Starbuck runs out of beans,
George