Big Brother Watching? To much info, or a cool program?

This entry is part 1 of 4 in the series Real Time GPS Tracker

I have been searching off and on for a way to let people know:

    a) Where I might be running when I am traveling, and if I am out in the hills somewhere maybe an idea of where I could be found if I don’t get back within a reasonable time.


    b) During a race where I might be at on the course so people know when I may be at a chosen location.

I tried a number of different ways, none seemed to be what I wanted.. there are programs that let you send the current location via email or SMS, but they did not do what I wanted. Some only have “fences” that can be programmed to let someone know when you get to a certain place, which is nice, but by the time I get to the end it is to late to let the person know.

Finally I came across “Real Time Tracker”, by Greenalp. This does what I have been looking for!

    a) it is free!


    b) it sends constant position updates, directly to a map, not just the link to a map.


    c) it can be put right here on Kazology.


    d) it can send text msg if you want it to.


    e) it is very configurable as to frequency of recording way points, and also when it transmit the data to the server.


    f) it WORKS! which at least one program I tried did not… I had to pull the battery to get it to stop.


    g) it also can do overlays, which I have not done yet, but sounds pretty cool, especially for races. I believe you can add a KML file of a route previously run and recorded, or for some bigger races a downloaded map of the course. Then when the Android is transmitting it shows not only the current location and track taken, but where on the course you actually are at any given time.


    h) it saves the last recorded route until a new one is started. The duration is configurable.


    i) it allows tracking of multiple phones. Maybe 3-5 standard, more as a paid service.


    j) you can create friends to share with, or wide open.

Check out the last, or current run!

Free real-time tracking. Free GPS tracker. Show your location live on Google Maps. Free for your Android phone.

This is particularly useful for runs when I am away from home so people can track if I am running or in a ditch. It can also be used during races to see where I am on the course… or pretending to run while I am sitting in a bar somewhere.

Recommended!

Until Real Time GPS is false,
George

Uploading Custom POI files to a Garmin GPS Unit.

In the first part of this two part series I wrote about creating a new POI file using ITN Converter and saving it so you may upload it into your GPS unit.

So, are you ready to proceed?

If you did not install the Garmin POI loader software when you got your unit, go and download it, then install it on your PC.
https://www8.garmin.com/products/poiloader/

Use the link to download. This page also mentions “Proximity Alerts” which you will need to set later when you are uploading your files to the GPS unit.

Uploading a custom POI file to a Garmin.GPS.

Now that you have the “POI Loader” installed you are ready to go. Get your GPS unit, plug it into your computer using a USB cable. When it is attached turn the GPS on. After a short time the the Garmin screen should show something like the following picture.
Uploading a custom POI file to a Garmin.GPS.

Now open the Garmin POI Loader software using your new desktop icon.
Uploading a custom POI file to a Garmin.GPS.

The software should open up, read what it has to say and then click “Next”.
Uploading a custom POI file to a Garmin.GPS.

The next screen asks where you want to save your POI file to. Until you learn more about this, leave the default “Garmin Device” radio button selected. If is does not happen to be selected, do so, then click “Next”.
Uploading a custom POI file to a Garmin.GPS.

If you have the Garmin plugged in properly, and it is turned on, the program should automatically find your device. You can click on the button (15) but should not have to do so. Either way, make sure it shows in the window before you proceed. Once it does, click “Next” (17).
Uploading a custom POI file to a Garmin.GPS.

In the next window you can clear the old POI’s from the unit (perhaps you have some you no longer want. If you are just adding new POI files, or overwriting your existing ones, then just leave “Linstall new customer POI’s onto your device” radio button selected. Then click on “Next”.
Uploading a custom POI file to a Garmin.GPS.

The next window requires some minor decisions to be made by you. Where is/are the POI files located at on your system. You do remember where you saved them from the first post when we created them… browse to that folder. (18)
Uploading a custom POI file to a Garmin.GPS.

TIP: If you begin making multiple POI files create separate folders for the “Current” and “Old” files.

TIP: If you begin making multiple POI files, or editing them and like to save the old versions as I do, then create separate folders for the “Current” and “Old” files. When you start to upload you will find it makes things much easier to select the files you want to use.
Pick your units of measure that you use. (19) and finally select whether you want the software to automatically upload everything, or if you want to do it manually. Select “Manual”! (20) I am pretty sure you won’t like the defaults on the automatic setting. Finally, click on “Next”. (21)
Uploading a custom POI file to a Garmin.GPS.

Once you click “Next” it will start preparing the files to upload. For every file it finds in the directory you selected it will ask what you wish to do with that file. (22) (This is why only having the current files in the directory is handy, you don’t have to skip all the files you do not want loaded.)
You can “Ignore the file” and go to the next one in the directory you selected. You can decide if you want “proximity alerts” for the file or not. (23) Basically these notify you when you are in range of any of the specific points contained in the file you are opening at the time. The “Alert when speed is greater than the Alert Speed” setting could be used to warn you to slow down when you are nearing your intended destination so you do not go past it, or maybe if you have “speed traps” programmed in it will just pop up a warning when you are in the vicinity of the programed locations. In that case a red box pops up on the GPS warning you that you are exceeding the speed you have selected. I like the “Alert whenever you get close to a point, and go with the default quarter mile (1320 feet). You might also like a half mile or some other distance. If so just enter it here and make sure you select the associated radio button. Once you have made your choices, click on “Next”. (24)
Uploading a custom POI file to a Garmin.GPS.

Once you have selected and configured the final file in the directory the software automatically goes to work. It converts the files to the correct format and loads them all into the GPS unit. This only takes a few seconds normally. Unless maybe you have some extremely large files. I have a total of almost 15,000 points I load and it goes quite rapidly. Once the “Congratulations” screen pops up you are done! Click “Finish (25) and then detach your GPS from the USB cable and go for a drive!
Uploading a custom POI file to a Garmin.GPS.

Now that you have added all your favorite POI’s you need to know how to find them on the unit! Since I had been using a Magellan unit for some time prior to getting the Garmin it took a few tries to get to them the first time. Once you do it though it is easy enough in the future.
When the unit starts up, you get the main screen. Click on “Where To?”.
Uploading a custom POI file to a Garmin.GPS.

On the next screen go to “Extras”
Uploading a custom POI file to a Garmin.GPS.

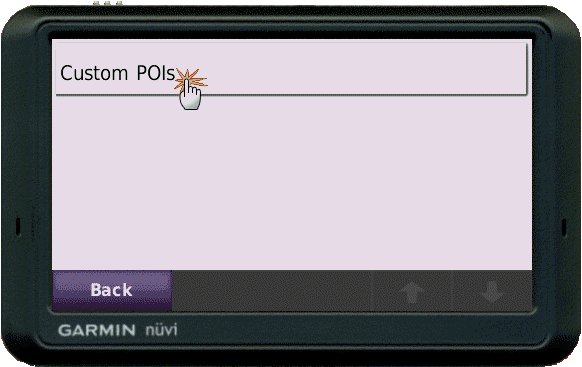
On the next screen go to “Custom POI’s” (Go figure…)
Uploading a custom POI file to a Garmin.GPS.

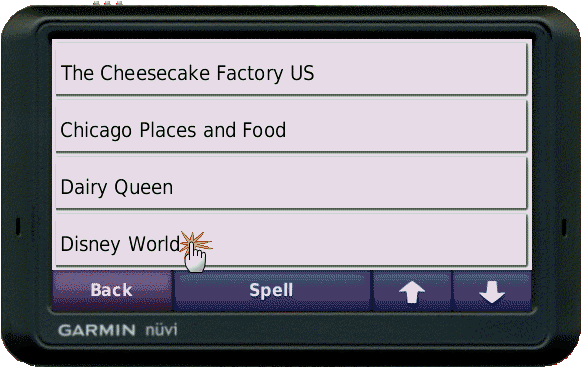
Finally if you have multiple Custom POI’s you will be given a choice of them. Here is why adding the number to the beginning of the file name helps to put the frequently used files at the top of the list.
Uploading a custom POI file to a Garmin.GPS.

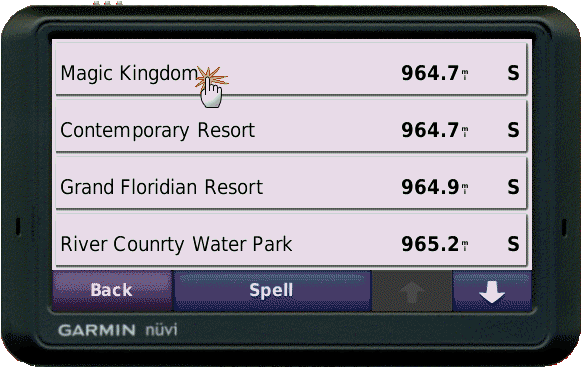
Now that you have the file loaded you can pick the location you want to navigate to from the list.
Uploading a custom POI file to a Garmin.GPS.

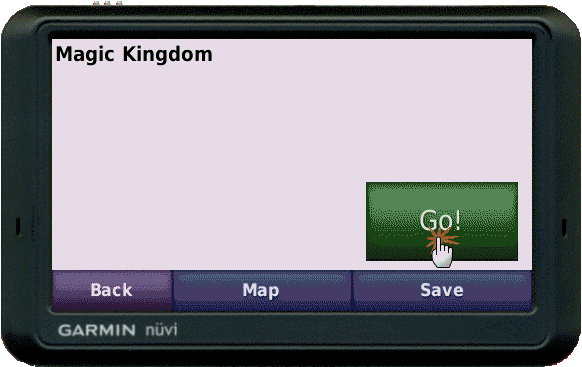
Verify this is the location you want to navigate to and hit “GO”!
Uploading a custom POI file to a Garmin.GPS.

And as soon as it calculates everything you are on your way!
Uploading a custom POI file to a<br /> Garmin.GPS.

Until the final way point is added,
George

Uploading Custom Garmin GPI files.

In the previous post in this series I explained how to create multiple .GPI files so you can edit just that file then update it in the GPS without going through every .CVS file that you have. This post explains how to add the files to your GPS unit.

Plug the unit in to your PC using the USB cable.

Hopefully after a few seconds (?) you should get the typical Windows (Oops, you are using an Apple? You are on your own…..) pop up that asks what you want to do now.

Select the “Open folder to see files” option. You may have a better way of doing this, I use Power Desk Explorer myself, but for simple explanation will use the Windows Explorer for now.

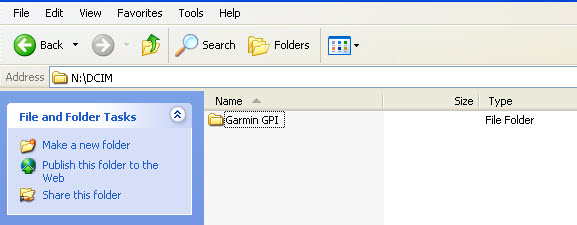
You should see a list of directories and files listed.

I made a new directory (folder) “Garmin GPI”.

Open another Windows Explorer pane. Find the directory in which you earlier created your custom GPI files. (Maybe the same directory name?)

Start the selection.

Drag all the files from the directory on your PC to the directory on your GPS. (Or… your SD card directory if you are doing it that way.)

You can move these files to an SD card and then insert it into your GPS unit also. When you turn the GPS on it will read the card and ask “If you want to make these available when the card is not inserted” (or something like that.) If you say “Yes” it copies the data to the GPS memory. At this point you could remove the card and the GPS would retain the POI points. Thats great, unless you also happen to have MP3’s or pictures on the card you want to listen to or view later in which case they are not available. You could leave the SD card in the unit, but then an interesting thing seems to happen… all your POI files will appear to be duplicated! The unit remembers that you added the custom POI’s to it’s memory so reads them, but then it also reads the card that is inserted and presents what it finds there also…. so you have two of everything. Initially this caused me some confusion, like what happened here. So I deleted everything and started over… after several times of the same thing happening I figured it out. Slow but get the job done…. usually.

So, if you select the “Add” option when presented you may want to remove the SD card, delete the .GPI files from it, then put it back in. I think that should resolve any duplicate issues.

Using your new POI files.

Start the GPS.

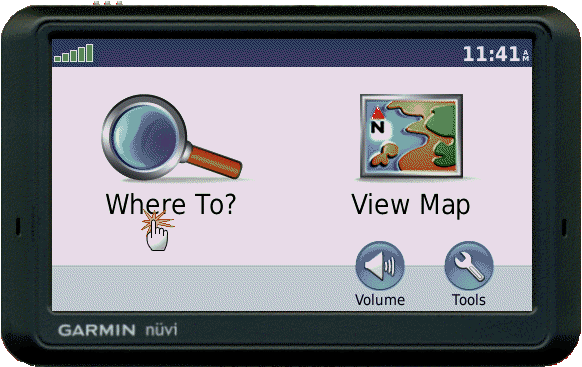
Select “Where To?”

Start the selection.

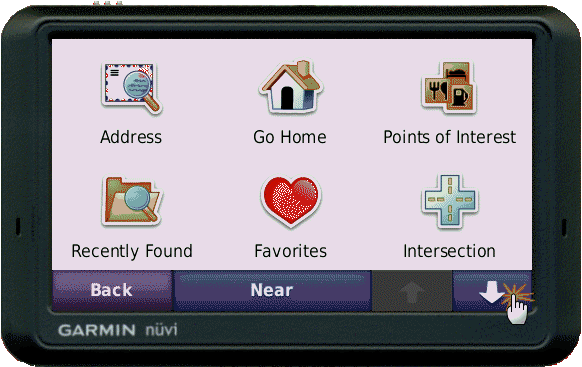
Use the “Down Arrow” to go to the second page of options.

Start the selection.

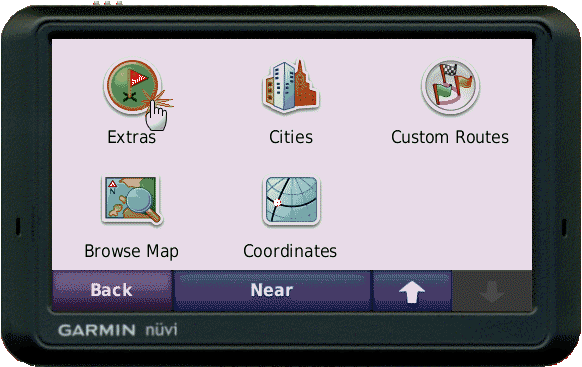
Tap on “Extras”.

Start the selection.

Tap on “Custom POIs”

Start the selection.

You should see a list of all the custom POI/GPI files that you have created an uploaded to the unit.

Start the selection.

Select the one you want (Here it was Disney World)

Now you will see the individual locations in the file.

Just tap on the one you want directions to!

Start the selection.

I want to go to the Magic Kingdom in Disney World Orlando… about a 964 mile drive it looks like.

Start the selection.

Tap on “Go!” and it will calculate and program the route.

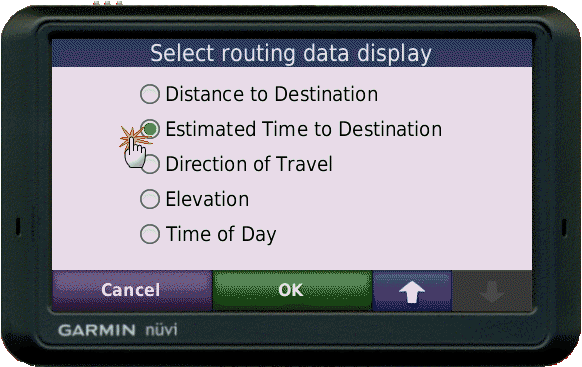
You can also select one of these options to display at the bottom of the window.

Start the selection.

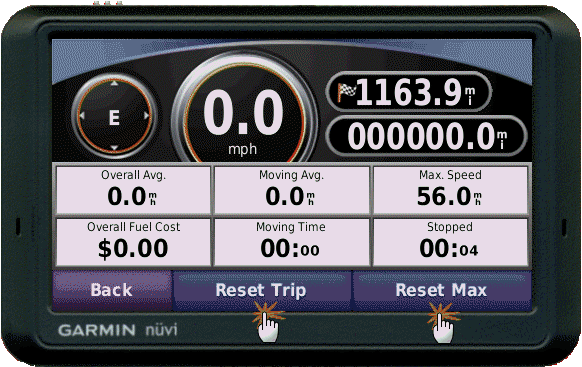
Before you begin your trip go in and reset the Trip Meter! Later you can retrieve the information from here on how far you drove, how long it took and other information. Advanced users can also use the .bin files to create maps on Google Earth and fun things like that.

Start the selection.

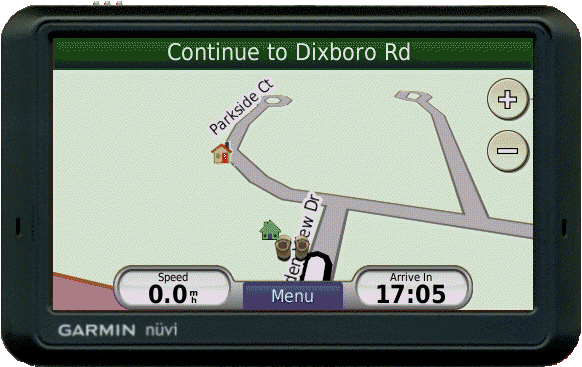
Now you are on your way!

Start the selection.

Creating a Custom POI file for Garmin GPS

I travel quite a bit for work, and find using a GPS to get me to all the different places I need to go is almost a necessity. There are also vacations with many places that we have never been to before. The days of carrying state maps in the glove compartment (Dating myself – but can you remember when you could get all the maps you wanted free at any gas station?) or an atlas in the trunk are over for me. Even the “high tech” method of using a mapping program to find a location, develop the route to the destination and then printing a map out are past their prime.

To get around to all these places with the least fuss I create different custom POI files for the Garmin Nuvi 755T that I received as a present. I would imagine the method I am going to detail on creating and uploading a custom POI file would apply to other models also.

First you need five things:

  • A Garmin GPS
  • Garmin POI loader software
  • A USB cable
  • ITN Converter software
  • An internet connection to download and use the ITN software.

First download the ITN software from https://benichougps.blogspot.com/
(Note: Clicking on any of the following pictures will enlarge (most of) them to allow you to see detail better.

Creating a custom POI file for a Garmin.GPS.

You may do better if you convert the page to English, although it is not really necessary.
Creating a custom POI file for a Garmin.GPS.

Click on the “Downloads” hyperlink.
Creating a custom POI file for a Garmin.GPS.

Follow the prompts to install the software to your PC. Once done you will have an icon like the following on your desktop.
Creating a custom POI file for a Garmin.GPS.

Once it is installed click on the icon to open the software. Then click on the “Editor” button in the lower right hand side.
Creating a custom POI file for a Garmin.GPS.

It will launch the program and open a link which displays Google Maps in a pane along with the program.
Creating a custom POI file for a Garmin.GPS.

Now the fun part starts! Where do you want to go?

Now the fun part starts! Where do you want to go? Type in a search string that gives you the results you want. (1) It can be an address or the name of a place. Here I wanted to find “Cobo Hall” in downtown Detroit Michigan since I was going to run a 10K “Turkey Trot” race there. Click the “Search Icon” (2). Now you have to pick the best match for where you want to go. I like to turn on the satellite view, (4) and zoom in so I can see the object fairly well. (5)

Creating a custom POI file for a Garmin.GPS. It may take a littel sleuthing to make sure you have the correct location. You can use the address that comes up and Google it to verify the address is the place you want. I often go to the Google Maps page and search there since it gives more detail on the place located. Once you are sure you have the correct location showing you can edit the name. (6) This name will later show in your GPS so you want it short and meaningful to you. Once you edit the name click on “OK”, then remember to click on “Add to itinerary” to save it to your list. (8)

TIP: You can click on the map to add a “pin” for the exact location you want.

TIP: You can click on the map to add a “pin” for the exact location you want. I like to do this so I can define a specific place I want to go such as a certain parking lot at a large park, or even the entrance or exit of a large building that I want to be closest to. Just add the pin then name it like above.

You should see it appear in your list of saved places (9)
In the file give your new file a name. (10) This name will later show in your GPS as the “Custom POI” file name. Again, you will want to give it a meaningful name.
Creating a custom POI file for a Garmin.GPS.

TIP:Organize your files!

TIP: I start all my file names with a series of numbers like 01, 02, 03, etc. This is because later the GPS will order the custom POI files in your GPS in this same order. I like to put the most commonly used ones first in the list to avoid a little bit of scrolling. You can always change the numbers later to add a file or rearrange them if you like.
Creating a custom POI file for a Garmin.GPS.

Repeat the above steps until you have as many waypoints as you want in your file. You can always come back and add more later if you want.
Once you have added all the points you want in this file, click on the X to close the editor.
Creating a custom POI file for a Garmin.GPS.

Once you close the editor it will automatically add the new locations to the file page.
Creating a custom POI file for a Garmin.GPS.
Now you are ready to save your file for later use. At the bottom of the window select “CVS” as a file type. (12) Then click on “Export”. (13)

When you click on export a file explorer opens, pick where you want to save your file, and the name you want it saved by. It will use the name you entered earlier by default but you can change it here if you like. Here I have added the “16” to the file name for later ordering of the files. Another tip is to use either the number of places contained in the file, or the date… or both as shown here. The number of entries in the file lets me know which “revision” it is if I edit the same file multiple times in a day.

That’s all there is to creating your first custom POI file! The ITN software makes this so easy to do I frequently go back in an add even one or two points to a given file. It’s easier than typing in an address in the GPS unit, and probably more accurate.

Now that you have a file what do you do with it? Come back in a week when I go through the details of how to best load the new custom POI’s into your unit.

Until the final POI is defined,
George

Upgrade your Magellan Maestro 3250 GPS Firmware, a How-To.

Upgrading a Magellan Maestro GPS Firmware – Install Firmware

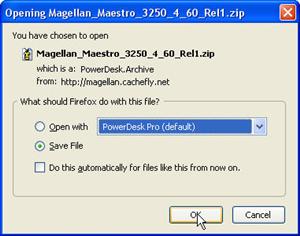
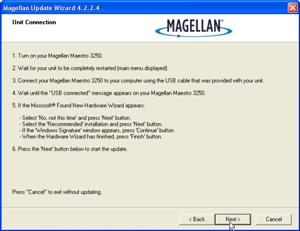
Before you attempt this step you should have completed the directions in the prior post to download the latest firmware for your unit off the Magellan web site.

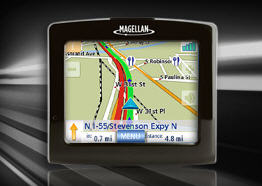
Magellan Maestro 3250 GPS Unit

When you completed the final step in obtaining the firmware upgrade (shown above) it was saved to your PC hard drive…. you remembered where…. didn’t you?

My Firefox download manager is set up to save downloads to the desktop where I can see them easily.

Magellan Maestro 3250 GPS Unit

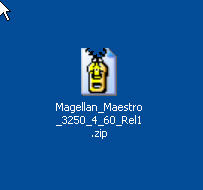
After it completes the download, you should have the file… here is the icon on my workspace/desktop.

Magellan Maestro 3250 GPS Unit

You may want to create a directory to put the extracted files, so create it first, but since there are only two files, if you want to extract them directly to the desktop it isn’t a big deal. You can just delete the later, or save them to another place, but I doubt if you would ever need them again.

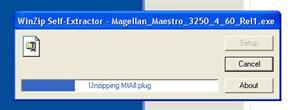
It is a self extracting .Zip file, so if you “double click” on the icon, it should begin the extraction process.

Magellan Maestro 3250 GPS Unit

Once it unzips it will start the install process.

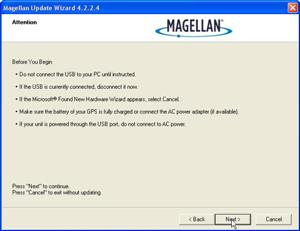
Do NOT have your unit plugged into the USB cable at this time! I think if you do, not only will it trash your GPS, it will reformat your hard drive.

Do NOT have your unit plugged into the USB cable at this time! I think if you do, not only will it trash your GPS, it will reformat your hard drive. Set your VCR time ahead two hours, turn the temperature up in your refrigerator so your beer is warm, it will also cause gas prices to go above $5 a gallon and melt the polar ice cap…. and you do NOT want to be responsible for all that! Leave the GPS unplugged!! Until it says to plug it in.

The defaults should be okay to leave as they are, so just click on “Next”.

Magellan Maestro 3250 GPS Unit

Magellan Maestro 3250 GPS Unit

When you get this screen it is okay to plug in!

Read carefully and take heed.

  • Make sure the unit is fully charged
  • Make sure it is turned on, and all the screens have opened so you are at a “street View.

Then, and only then, click on the Next Button.

Continue reading

Creating a Custom POI File for Magellan GPS – Part 2

In the prior post in this series I went through creating the actual POI file using ITN Converter. In this post I am going to show you how to make that file actually useful for something… like finding locations with your GPS!

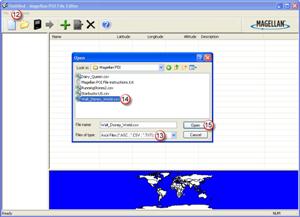
Open the Magellan POI Editor. Then open the .CSV file you previously created. As shown in (13) select .CSV since that is what you created last time (or should have). Select the file you created in (14), and then click on Open (15).

You did download the Magelan POI Editor from the earlier post…. correct? *Sigh*
Here it is again….

Download Magellan POI Editor – UPDATE 12/14/2015 this pointed to a link that was no longer valid so I removed it.

Magellan Maestro 3250 GPS Unit

Small and portable it can be used in the car or stuck in a pocket for pedistrian use – like walking around Disney World! (Batteries are supposed to be good for 3 hours or so.)

Okay, now that you downloaded the POI Editor, and know where it is at, go ahead and open the Magellan POI Editor. Then open the .CSV file you previously created. As shown in (13) select file type of .CSV since that is what you created last time (or should have). Select the file you created in (14), and then click on Open (15).


The Magellan POI File Editor - Open File dialog box.

Use the dialog box to browse to the .CSV file you previously created.


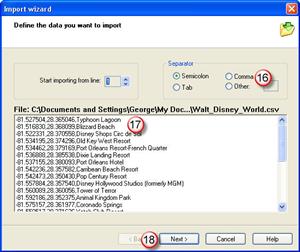
The software will automatically open the Import Wizard when it sees you open a .CSV file.

The software will automatically open the Import Wizard when it sees you open a .CSV file. Unless you have a “header” line that you saved (it the view window it would probably look different than the other data shown.) You should leave the “Start Importing from line = 1, set to 1. Some downloaded files have several rows of information about where the file came from, what’s included, who made it, etc. so you may need to change this to line 2, 3, or ?

Continue reading