Real Time GPS Tracker Part 2

This entry is part 3 of 4 in the series Real Time GPS Tracker

I wanted to show you how Real Time GPS Tracker works when you go to the web site and view the map during a run. But while the web site dispays a series of actual points during the run, it does not maintain the information in a method that allows it to be replayed.

Using Real Time GPS Tracker to run the Winnipesaukee River Trail between Franklin and Northfield New Hampshire. When I go to New Hampshire on business I always like to run the Winnipesaukee River Trail at least once. It is a nice six mile “out and back” which is an old train route. I have documented in in pictures before. This time I tried a little experiment using Greenalp Real Time GPS Tracker, a little utility that I have been playing with recently.

Since I cannot see where I am running, while I am running I wanted to make a movie of the run… which is also what I wanted to post on the blog to show how Real Time GPS Tracker works.

First I logged onto the Greenalp web site, and set up all the tracking information. I verified that as one of the two allowed map overlays I had loaded was for the “WRT”, then went to the map page to verify the overlay was visible. NOTE: If you have not sent any information from the phone app to the server the map appears blank. This makes it hard to determine what will happen in the next steps. So allow the phone to send your location, then you can turn it back off.

You may want to change the zoom factor on the map to capture more, or less, detail depending on the length of the run you are planning. You can make the map full screen and zoom in so you can see the entire overlay of where you will be running, if you are using an overlay. If you zoom in to far, the map will self center so you will be able to see the point, but it may cause unwanted jumping around of the screen. Conversely, if you zoom out to far the track is so compressed you will not be able to see where the run occured in any detail.

The next part of this was figuring out how to make a movie of the run. While I could have easily done a screen dump during the entire run I was concerned it would create a huge file that would be a)boring b) difficult to download. What I wanted to do was a “time lapse” movie. So, how to do that was the next challenge. After much searching I ended up using two programs I already had 1) Snagit and 2) Windows Movie Maker. https://www.techsmith.com/snagit.html

https://windows.microsoft.com/is-IS/windows/get-movie-maker-download

After much experimenting I found that SnagIt does not directly capture time lapse movies, even though it says it can do this. NOTE: If you know how to do this please let me know the secret! So I created a new profile to take automatic screen captures every X seconds. It must also have automatic file naming activated. After testing it a couple of times I felt I had a workable solution. I let it run awhile taking screen captures to see how large things were going to get. Once I had about 100 individual screen shots saved as .png files (other types can be used.) I wanted to try creating a movie. I fired up Windows Movie Maker and imported all the screen captures. I drug, dragged… moved all the files into the time line and then played around a little bit with the transistion effects, basically cutting the display and transistion to as short as it would allow me to. This resulted in about a 40 second, 90 megabyte movie. (This is higly dependent on screen resolution, capture size, file type, frequency, etc.) Then i used the “create movie” to make a movie. (.WMV) Success! Worked great.

So, last night I was able to get out to the “River Trail” for a run. Before I left the hotel I started the app on the phone, I logged onto the Greenalp web page, pulled up the map, and then screwed up. I did not allow the phone to send the location (hence the note above!) and then I did not zoom in the way I meant to. Anyway, I did my run, got back to hotel, stopped SnagIt. Created the movie, and ready to post it on the blog.

Tracking a run with Real Time GPS Tracker
It appears I lost GPS signal a couple of places, even though the Garmin watch never did. The track has a strange leg in it over to Mount Cardigan, which is a place I have run before, but don’t know why it would show up on this map.

Anyway, if you are looking for a way to track runs, but especially for others to see where you are running in real time, this is working great for me. The whole movie thing was just an experiment to see if I could capture a track to show what it looks like here on the blog. It is not something I plan to do on normal runs, where the Garmin 305 combined with Sport Tracks does a better job of recording “historical” data.

Enjoy

George
Big Brother Watching? To much info, or a cool program?

This entry is part 1 of 4 in the series Real Time GPS Tracker

I have been searching off and on for a way to let people know:

    a) Where I might be running when I am traveling, and if I am out in the hills somewhere maybe an idea of where I could be found if I don’t get back within a reasonable time.


    b) During a race where I might be at on the course so people know when I may be at a chosen location.

I tried a number of different ways, none seemed to be what I wanted.. there are programs that let you send the current location via email or SMS, but they did not do what I wanted. Some only have “fences” that can be programmed to let someone know when you get to a certain place, which is nice, but by the time I get to the end it is to late to let the person know.

Finally I came across “Real Time Tracker”, by Greenalp. This does what I have been looking for!

    a) it is free!


    b) it sends constant position updates, directly to a map, not just the link to a map.


    c) it can be put right here on Kazology.


    d) it can send text msg if you want it to.


    e) it is very configurable as to frequency of recording way points, and also when it transmit the data to the server.


    f) it WORKS! which at least one program I tried did not… I had to pull the battery to get it to stop.


    g) it also can do overlays, which I have not done yet, but sounds pretty cool, especially for races. I believe you can add a KML file of a route previously run and recorded, or for some bigger races a downloaded map of the course. Then when the Android is transmitting it shows not only the current location and track taken, but where on the course you actually are at any given time.


    h) it saves the last recorded route until a new one is started. The duration is configurable.


    i) it allows tracking of multiple phones. Maybe 3-5 standard, more as a paid service.


    j) you can create friends to share with, or wide open.

Check out the last, or current run!

Free real-time tracking. Free GPS tracker. Show your location live on Google Maps. Free for your Android phone.

This is particularly useful for runs when I am away from home so people can track if I am running or in a ditch. It can also be used during races to see where I am on the course… or pretending to run while I am sitting in a bar somewhere.

Recommended!

Until Real Time GPS is false,
George

An Amazing Time at Marvins Marvelous Mechanical Museum!

We had seen an article about “Marvin’s Marvelous Mechanical Museum” in a “Things to Do” book. It sounded interesting, but we never got around to visiting it.
Well, we finally did, and the panel of experts all agree, it was worth the time!

It is not a far drive up to Farmington Hills from Ann Arbor, so we left about noon, stopped for some lunch and got to the museum about 2 pm.
Marvins Marvelous Mechanical Museum
I was surprised, there was no entry fee. I expected to pay a few bucks just to get inside.
When you open the door and walk it, it is a smorgasbord of sights and sounds for the senses to feed on!

I suggest you use one of the picture links to view the entire photo album so you can see what I mean!

Towards the end of the visit a nice person was standing between some machines just sort of watching. I realized this was Marvin in person. I said “Hello” and he immediately struck up a conversation. He wanted to show us the “Tic-Tac-Toe” playing chicken, which I think is one of his favorites from the literature and advertising I have seen.

Marvins Marvelous Mechanical Museum

Marvins favorite Arcade item?


Marvins Marvelous Mechanical Museum

At the end the chicken will reward you with a nice post card

Marvins Marvelous Mechanical Museum

I can only still imagine what this did… I did not try a quarter to see it in action.

Marvins Marvelous Mechanical Museum

Some things are just better left to the imagination.

We spent several hours roaming around the place. It is not huge, but it is packed, and I do mean packed, with interesting articles from the rafters to the floor, and every nook and cranny in between.

If you are in the Detroit area, and Farmington Hills with a few extra hours take time to stop by and see this place!

Until the final quarter is played,

George


How to FTP files to an iPod Touch / Phone or iPad – Part Two

This entry is part 2 of 4 in the series FTP to iPod Touch

Now that you have the FileApp App and probably played around with it… and if you haven’t already figured it out. (Hey I did it so it ain’t all that hard….)

The first step is to start the file sharing program. Just click on “Start Sharing”… oh wait a minute… you are using your wireless network, or on you PC/Laptop.. see warning in Part One of this project.

Open the program.

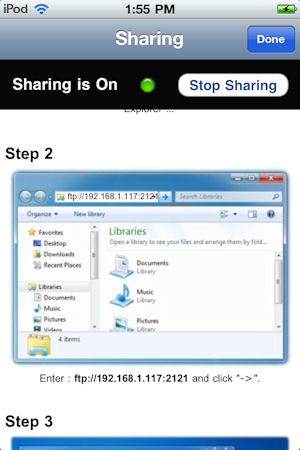
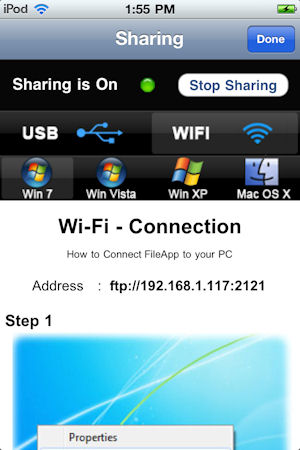
The program will show what the IP address for the iPod is that you should use.

Open the program.

The you are supposed to be ready to go using a normal web browser and “Drag and Drop”. I didn’t get this to work for me though. (Update: I did get this to work… but with other issues. See upcoming post.)

Open the program.

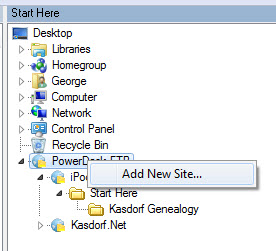
I used an FTP Program instead. (I may go back and try the browser method again since I think more people would use that method than using FTP client.) There are lots of free FTP clients out there like Cute FTP. Mine happens to be built into the file manager program I have used for many years “Power Desk”.

Begin, in whatever FGP program you use by adding a new FTP site. tippmix eredmények él?

Open the program.

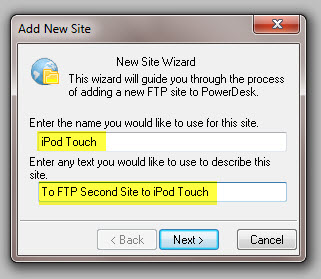
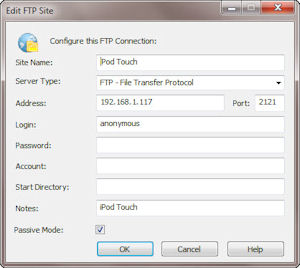
Name the site anything you want.

Open the program.

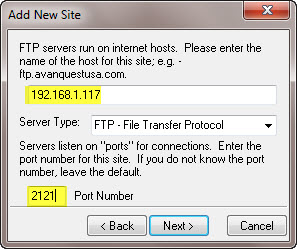
Use the IP address shown on the iPod, FileApp earlier. (192.168.1.117 in my case) Add the PORT number which is shown after the colon in the IP address in FileApp (2121 in my case.)

Open the program.

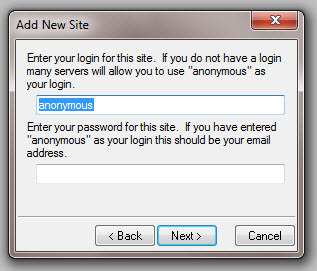
I used the “anonymous” logon, just leaving it the way it was…. and leaving the “password” blank.

Open the program.

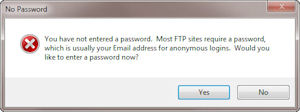
If it asks for a password I just click on “No”.

Open the program.

Ignore this message, or at least I did.

Open the program.

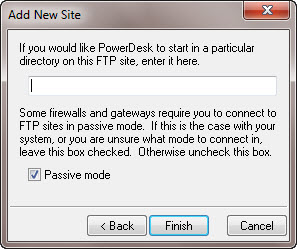
The final setting, for my FTP program look like this.

Open the program.

Now try to open your FTP session, you may get a prompt for a password… I just cancel this.

Open the program.

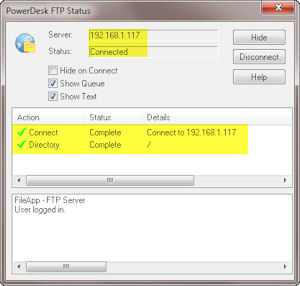
If it all goes according to plan you have a successful connect dialog box! gaminator kalandtúra

Open the program.

Now you can start the fun stuff!

You should see a method to move files depending on your FTP client.

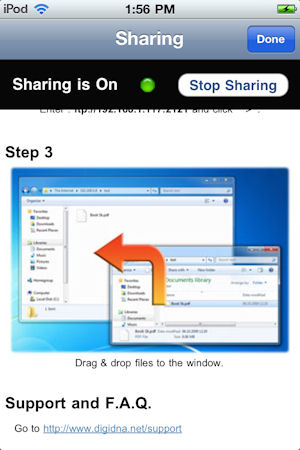
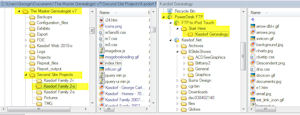
I started by dragging my entire Second Site HTML folder over to the “root” which seems to be “Start Here”. I haven’t tried to rename that, no reason to I guess. I did make a subfolder “Kasdorf Genealogy” using the FTP client first, then put all the files in it.

Open the program.

Next, using the FileApp Program.

George

FTP to an iPod Touch (in 125 easy steps!)

This entry is part 1 of 4 in the series FTP to iPod Touch

Well, really it isn’t nearly that many… if you do it right the first time, or maybe even the second.

Why am I writing this… the result of a “quest”. After being inspired by a person working on their family tree, I have been working on the family genealogy a little recently. Since I migrated to Windows 7 (64 bit) my old Ultimate Family Tree program would no longer work. I searched around a little, and bought Family Tree Maker.. for the third time. I used it once, maybe twice and decided it did not do what I wanted. To basic, not enough flexibility. So backed up and tried “TMG” The Master Genealogist. A very full featured program. It does come with a bit of a learning curve, but working a little at a time and reading what I could find I am getting it working. One really great add on is “Second Site” a program that reads the TMG data and creates web pages from it… and what web pages. There are more options than you can deal with (almost).

While researching I started reading the forums on TMG and also the Roots L for TMG. One question came up, “How can I put my data on an iPod Touch (and/or an iPad). No one seemed to have a complete answer. Most responses were to create a GEDCOM file, use a software that could then import to iPod and read the GEDCOM. I suppose this works, but it got me to wondering if and how I could transfer any files, and use my Second Site web site on the iPod or iPad. Several articles I found seemed way to complicated… some apps seemed way to expensive to try “just for fun”.

I finally found an app on the Apple Web Store “FileApp”. It sounded like it would do what I wanted, and had the benefit of being free so it it did not work I was out nothing except a little time and effort.

Continue reading

Now this is “Blog-Worthy”

Sometimes it is the simple things in life that can give the most pleasure! I have been using WordPress for years now. I just looked at the archives and it appears the first post was October 30, 2005. However since in that entry I wrote about adding an RSS feed to the blog I have to believe there were a few earlier posts also, they must have been lost. I vaguely remember a great crash that took out the blog at one point early on so unless they are cached somewhere on the web, they are gone forever. But that is not what this was about. . . I digress.

Ah yes, simple things and pleasure, now I remember.

Ah yes, simple things and pleasure, now I remember. During the last five years of using WordPress I have gone through many core upgrades. (Replacing the WordPress code on the server with updated code.) The early ones were stressful, delete these files, add these files, change the text in some files, update everything and hope to heck it works when you are done. The early loss mentioned above was traumatic, but since it was very early on in the life of the blog it wasn’t enough to where I would say “To hell with it, I am not going to try and recreate all that”… plus it was early on in the life of the blog and I was full of spirit yet. Then the WordPress team cam came along with “Automatic” updates where all you had to do was press a button and TA-DA, the script ran and the core, plug-in etc. was updated without the user having to do anything… other than push that button that is. ‘cept… there is always a ‘cept or “But” you know… always. For me and my WordPress it seemed to never work. On a rare occasion a plug-in would actually update when I pushed the button, but that was rare, very rare. So for several years I developed a routine.
A) Go to Admin panel
B) See there are updates available for a plug-in, (and yes back “in the day” you were not notified when there were updates, you just sort of checked frequently to see there there were any issued.)
C) click on the “Automatic Upgrade” button.
D) Watch the program automatically download the Zip file containing the upgrade
E) Watch as it quit doing anything useful and sit there until I lost patience and shut down the web page.
F) Go to the plug-in page on WordPress.org using the link in the blog plugin page.
G) Manually download the plug-in
H) Create a new directory on local drive
I) Unzip the plug-in to the new directory
J) Open an FTP session
K) Turn off the plug in in WordPress control panel
L) Delete the plug-in directory on the server
M) Copy the new plug-in directory to the server
N) Go back to the WordPress control panel and activate the plug-in
O) Hope it did not crash the system.
P) Repeat C through O for each of the new updates

This week I decided to take the risk and stress to update to the latest version of WordPress 3.0.1. So as always I clicked on the automatic upgrade button, and low and behold but what do you think happened? Of course, it crashed the system. Okay, reset everything, go through the manual install… following steps A through P above. The actual program update went pretty well, but then I got to the plugins and restarting them. Boom – the “500” error. Okay, deactivate all the plug-ins by renaming all of them. Now restart WordPress, now rename all the plug-ins back again. Now re-activate them one at a time until the “500” error comes back. Mark down that plug-in in, rename it, then go on to the next one…. one after the other after the other. VERY time consuming.

After I got everything working again, minus a few of the plug-ins that were causing the 500 error where the author has not updated the plug-in yet, I took a break from everything WordPress. Not upset, just “Head clearing time”.

As I did other things I thought, “I am not going to keep doing this for the next X number of years!”. So I started searching the WordPress forums for an answer. The first observation is that MANY people have this issue. So the automatic upgrading in not all that automatic for many people. The next observation is that the 1 & 1 hosting service seems to be a big offender. Now for observation one, I know from other issues most people write when they have a problem, not when things go right, so it always looks like everyone is having a problem.. same with computer or other hardware issues…. As for observation two, well 1 & 1 is a large hosting service so they probably do have a lot of people with the same issue. Also since it is large trying to get them to change something to make it work for a certain group of users (WordPress) may not be that easy so the people with problems just multiplies.

Then I started finding different “fixes” for the issue. From cross your fingers and pray, to “it isn’t hard to do a manual upgrade, so just do it”, to “I did a complete reinstall of WordPress and it .. nope, didn’t fix it!

Then I noticed a number of threads with the same basic fix, a few lines of code/text to put into the “.htaccess” file, which I also found out stands for “HyperTextAccess” a small routine which the host server reads when it looks at the directory which contains it. (or it could be in the root directory and pointing to the WordPress directory…)

There were actually a couple different entries suggested, but the one that seemed to help most people was a very simple two lines of text:

AddType x-mapp-php5 .php
AddHandler x-mapp-php5 .php

I decided it was worth a try, and really it can’t hurt since the .htaccess file can just be deleted if something goes wrong. (If you do this, you may want to save a copy of the original just to be safe.)
I opened up the .htaccess file in Notepad (or any ascii/text editor) and typed in those two little lines, copied the file back to the WordPress root directory and fired up the browser!

In the WP Control panel there were two themes which it was saying there were updates for. (A new feature in 3.01?) I had tried the automatic update before, and it did the usual “Downloading XXXX.zip” and then complete stop……………….
I went back to the same place and clicked on the update button… Well, what do you know… it downloaded those suckers in a few seconds, installed them and told me everything was okay in a matter of a few seconds! I went out to the web page and back to the control panel just to make sure I did not get a 500 error or “System in maintenance” error, and everything seems to now be working perfectly! Now I can hardly wait for a few plugin updates to come out so I can try it on them…. Maybe, just maybe even the full core code update will work next time!

Apparently the two lines of code above tell the server to use PHP version 5 which is what works with WordPress. I don’t know the technical detail even though I read about it on the web, and I don’t know that I care. I do know it seems to have fixed my problem and that is what I do care about.

Enjoy,
George