An easier method of updating Garmin Custom POI files.

After I found a few early attempts to make custom POI files to be both entertaining and useful I have been experimenting with other GPS projects.

The latest is figuring out the best method to actually put these POI files into the GPS unit.

As the collection of custom POI files grew the aggravation of loading them into the unit also rapidly increased. I felt there must be a better method of updating and uploading these to the Garmin unit.

A little background on how POI files work. ??????? ???? ???? ????? *Disclaimer* I am no expert on Garmin (or any other GPS) units or the software. I just have experimented with them and this is what I found in practice or researching on the web.

It seems the way the POI file works, if you use the Garmin POI loader anyway, is that it takes the directory of POI files you specify, then goes through the list and presents each one to you. You make the selections as you go (see earlier posts on this.) and when each file has been reviewed it compiles your selections into one POI file called “POI.GPI” and uploads it to the GPS unit overwriting the existing single POI file. The upshot of this is you must add every file making every selection (ignore, alerts, distance, etc) every time for every file. If you do not do so it does not add that POI file to the compiled file to upload. Then when you go to your new “Custom POI” files in the unit you cannot find them. If you are adding or updating any one of your custom POI files having to re list every one of your “sub files = .cvs file” can get tiresome very quickly. So I started looking for a way to get around this by hopefully being able to update single POI files.

*GPI is “Garmin Points (of) Interest”.

After a few false starts it seems the best way to accomplish this is to create individual POI.GPI files still using the Garmin POI Loader software…. just making a different selection and then uploading the resulting files (Note the plural “files” here…) manually…. which is what I am going to show you in the remainder of this post. The Garmin unit when turned on will find all “GPI” files located on the unit whether they are on built in memory, or on an SD card in the slot. This actually caused me some confusion for awhile, see more on this in the next post.

So… let’s get started.
First, you do have the Garmin POI Loader software installed, correct? If not go to the Garmin web site, download the software, install it and return to this page.

Here is the download page on the Garmin site.
…. taps fingers…. whistles a short tune…. plays five games of solitaire…. OH, welcome back.
NOW let’s get started.
Open the POI Loader.
Start the selection.

Start the selection.

Click on the “Next” button.

Start the selection.

Click on “Custom” Folder (Advanced). ????? ??? ???? ????? See you are already an advanced user after only a few minutes of reading this article.

Now click on “Next”.

Oh wait… let’s take a slight detour…you might want to create a new directory to put the individual GPI files you are about to create into… just to keep some order to things here. I created a “GPI Files” directory for this purpose.

Start the selection.

Now select the new folder using this screen.

Start the selection.

Now you do the same thing, except this is where your custom “cvs” files are being kept.

Again, you may wish to create a new blank directory and move only the files you want to work with into it. Remember the loader is going to ask you information on every cvs file in this directory. You may find it easier and quicker to move one or only a few files into this directory from your “Master” directory especially if you have a lot of .cvs files.

In this screen you definitely want to select “Manual” or it will process everything in the directory you specify thus defeating the entire purpose of this guide.

When you are ready, click on “Next”.

Start the selection.

When you click on next it presents the selections you can make. These selections are not that complex, but actually do create different types of files…. “alerts”, “red light warnings”, “speed alerts”, “Tour Guides” and so on which are beyond the scope of this post. If you do not know what they do, for now you can just deselect both of the check boxs. UNLESS you have multiple .cvs files in the directory you specified. Then you want to select the “Ignore this file? for everything except the first file in your list… then when you cycle through this process to create your next gpi file you will “ignore” the first file, use the second the ignore the rest of the files. All this depends on how many files are in your directory. Bottom line is that during each “pass” through this procedure you only select one file each time.

Start the selection.

After you use the first .cvs file presented “ignore” all the rest of the files you are asked about.

Start the selection.

When you get to the final .cvs file it will automatically create the new POI.GPI file where you specificed earlier.

Now, and this is important, you must rename the “Poi.gpi” file to something else. I give it the name of what types of locations are in the file….. if you do not do this when you go through the steps above to create your next gpi file it will just overwrite the existing Poi.gpi file with the information from the selected .cvs file. It will automatically create the Poi.gpi file you do not have to copy and rename it.

Start the selection.

Continue through the steps above until you have turned all your xxx.cvs files into an equivalent xxx.gpi file. You should have a directory full of .gpi files like shown above…. of course yours probably will have different names!

2010 Disney Marathon January 10, 2010 Orlando Florida – wait – I was in Florida?

Almost a year ago I signed up for the 2010 Disney Marathon. Since it normally sells out early I wanted to make sure I got in this year. It sure is hard to predict what is going to happen that far in the future! Who would have thought that on this weekend in Orlando Florida it would in the upper 20 degree Fahrenheit with icy cold winds and even some sleet thrown in! What a race weekend. I had packed for cool temperatures. I had old “throw-a-way” sweats so I could keep warm and then discard. I had gloves, even made some disposable arm warmers our of old – I mean old – athletic socks, the almost to the knee type, quite bulky they were again with the idea they would be tossed along the course when it warmed up.
Mickey is one cool dude, ready to roll in the marathon.

The 2010 Disney Marathon Experience.

What I didn’t pack was running tights, but I did not expect it to be “that” cold. Lesson learned… for the space they would have taken up it would have made it much more comfortable.  The race start is at 5:40 am, so it is an early morning! Up at 3 to start dressing, taping sensitive areas, anti-chaffing lube, etc. I had brought oat meal (instant) to have since I figured there would not be any place to get something at that hour, but what I did not count on was there was no microwave, or even coffee pot in the room. I travel often for work and have found it easy to make oatmeal using the instant coffee makers so that was my plan. Without one though I did the best I could…. ran the tap water until it was as hot as it was going to get, then mixed it up using that…. it was edible and served to get me something in the stomach is the best I can say for that.

We headed off about 4 am to catch the shuttle bus from the hotel (Disney Pop Century resort) to the venue. As we were sitting and relaxing we could see people driving in sitting in miles of traffic backed up. This was one of the reasons I elected to stay on Disney property. The hotel was not that great, but the shuttle service to different activities is great, plus it saves a minimum of $14 parking every trip. Plus you get dropped off a lot closer to the gate/activity than if you parked since that normally requires an additional tram ride from the parking to the gate.

Still had to walk a couple of blocks to the main area… then got “lost” could not find the start area, and even asking several people could not find it… they said they were looking also…. Finally found a person that said you have to go through the gear drop off tents, come out the other side, then walk another half mile (at least) to the start area. Whew… was starting to wonder what was going on.  People there were doing everything they could to keep warm. I saw hotel towels wrapped around heads, blankets turned into serapes, garbage bags, quilts, space blankets (people who ran Saturday) and many other methods to keep warm. NO one actually looked warm though.

Finally could hear the announcer, then fire works went off followed by a roar from the crowd and we were off. I only was about 2 minutes from the start line while I understand others may have been an hour or more (?) before they got to the start line. The race itself went pretty good…up to a point. I was right on my plan, ticking off about 10:30 miles consistently. Heart rate never went up, breathing stayed pretty good, not labored or struggling at all. Stopped a couple of times for some photos to be taken with characters along the route, and a few shots of the park, hot air balloon and other things. (Check the photo album for all these.) Saw Paul several times along the course. He was following the suggested viewing points map and hustling from one place to another. We did see each other at the start, then missed at the four mile mark…. odd since it was the exact same place since it was a loop! Then again at 9 and 12 miles which was the final until the finish. Ran through the castle and got in line to have my picture taken in front of it… unfortunately I still had the old sweatshirt on. While I was in line I was struggling to get it off so my bib number would show so I could find the picture later. I was hopelessly trapped in the damn thing! Finally I got it over my head and off one arm, but it got hung up on the Garmin and it was my turn to go for a picture. I am sure when they are ready I will find myself with a big smile and a bigger sweatshirt ball around my left hand! Oh well.

After the picture I did get it off and dumped in by a trash can. I had been sweating up a storm in it so was happy to have it off…. for about two minutes, then the sweat started to cool off and I got pretty cold again. It didn’t help that at the same time we headed out of the park and onto the road, and in shade. Kept plodding along until about mile 23, then as they say “The wheels fell off”… big time. My HR still good, calves, thighs and hamstrings seemed to be fine, no breathing issues but my hips went completely to hell and back… well not back I guess. The next three miles were pretty miserable, and the pace dropped off to the 15 minute range. I was on pace for under five hours up to mile 23, then with those times there was no way that was gonna happen. I was pretty happy when the finish line came into sight! Managed to get the legs moving for the last several hundred yards and made it across the line.  Got my reflective blanket which felt really good, my medal which looked really nice, and some food. Found Paul and we got pictures with Chip and Dale and then I was ready to head to the hotel and a warm shower, which is what we did.

So ends my first marathon. At 5:13 time I was hoping for sub 5 hour, but this only means the next one will be easy to PR in…. just when that will be is still undecided, so stay tuned.

The official bib has your name on it. This allows the spectators along the course to heckle cheer you on!

The 2010 Disney Marathon bib.

A blanket at the end feels pretty good! As you start cooling down the sweat makes things a little nippy. Temps are still in the low 30’s at this time.

The 2010 Disney Marathon Experience at the end of the race.

Picture that opens when you click above: At this point I think I am actually going to make it, although if you could see a video of me right now you might swear I am really going backwards….

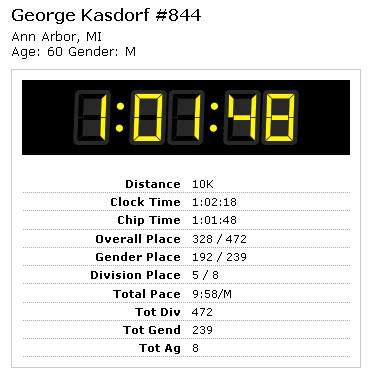
The final stats for the race, certainly not what I thought going in, but still not that big a disaster for my first marathon.
The 2010 Disney Marathon Final Stats.

The course winds through the parks for 26.2 miles.
The 2010 Disney Marathon Experience.

…. and Mickey heads off to somewhere, to do something….
The 2010 Disney Marathon Experience.

They give out one of the better medals… oohhh…. shiny…..
The 2010 Disney Marathon Experience.

At the end we got some pictures taken with the Disney characters. They are in hurry to get everyone through, so didn’t get the perfect picture, but it was still fun.
The 2010 Disney Marathon Experience.

    …. and this breaks down into these numbers for the race:
    a) 26.2 Miles
    b) finished 8842 out of 16883 overall in the marathon mile. (Top 52%)
    c) finished 88 out of 227 in my age group – M60-64. (38.7%)
    d) finished 5397 out of 8731 men. (62% – pretty low, sigh.)
    e) had a 11:47 overall pace, and a 5:13.33 total chip time. (5 hour 13 minute)
    f) You can see the full details on the running stats web page.(Index) or this specific race.
    h) had a great time – which is always the goal right?… Right!

Until Mickeys ears freeze and fall to the ground by the iguanas,
George

Uploading Custom Garmin GPI files.

In the previous post in this series I explained how to create multiple .GPI files so you can edit just that file then update it in the GPS without going through every .CVS file that you have. This post explains how to add the files to your GPS unit.

Plug the unit in to your PC using the USB cable.

Hopefully after a few seconds (?) you should get the typical Windows (Oops, you are using an Apple? You are on your own…..) pop up that asks what you want to do now.

Select the “Open folder to see files” option. You may have a better way of doing this, I use Power Desk Explorer myself, but for simple explanation will use the Windows Explorer for now.

You should see a list of directories and files listed.

I made a new directory (folder) “Garmin GPI”.

Open another Windows Explorer pane. Find the directory in which you earlier created your custom GPI files. (Maybe the same directory name?)

Start the selection.

Drag all the files from the directory on your PC to the directory on your GPS. (Or… your SD card directory if you are doing it that way.)

You can move these files to an SD card and then insert it into your GPS unit also. When you turn the GPS on it will read the card and ask “If you want to make these available when the card is not inserted” (or something like that.) If you say “Yes” it copies the data to the GPS memory. At this point you could remove the card and the GPS would retain the POI points. Thats great, unless you also happen to have MP3’s or pictures on the card you want to listen to or view later in which case they are not available. You could leave the SD card in the unit, but then an interesting thing seems to happen… all your POI files will appear to be duplicated! The unit remembers that you added the custom POI’s to it’s memory so reads them, but then it also reads the card that is inserted and presents what it finds there also…. so you have two of everything. Initially this caused me some confusion, like what happened here. So I deleted everything and started over… after several times of the same thing happening I figured it out. Slow but get the job done…. usually.

So, if you select the “Add” option when presented you may want to remove the SD card, delete the .GPI files from it, then put it back in. I think that should resolve any duplicate issues.

Using your new POI files.

Start the GPS.

Select “Where To?”

Start the selection.

Use the “Down Arrow” to go to the second page of options.

Start the selection.

Tap on “Extras”.

Start the selection.

Tap on “Custom POIs”

Start the selection.

You should see a list of all the custom POI/GPI files that you have created an uploaded to the unit.

Start the selection.

Select the one you want (Here it was Disney World)

Now you will see the individual locations in the file.

Just tap on the one you want directions to!

Start the selection.

I want to go to the Magic Kingdom in Disney World Orlando… about a 964 mile drive it looks like.

Start the selection.

Tap on “Go!” and it will calculate and program the route.

You can also select one of these options to display at the bottom of the window.

Start the selection.

Before you begin your trip go in and reset the Trip Meter! Later you can retrieve the information from here on how far you drove, how long it took and other information. Advanced users can also use the .bin files to create maps on Google Earth and fun things like that.

Start the selection.

Now you are on your way!

Start the selection.

2009 Belle Isle New Year’s Eve 4 Mile Race

Who: Me
What: 4 Mile Race
When: New Year’s Eve 2009,
Where: Bell Isle, Detroit Michigan
Why: Darn good question

The Belle Isle 4 mile race celebrated it’s 40th anniversary this year which must put it up there for one of the older races in the Detroit area. The activities such as packet pick up, restroom and then after race result posting along with food and drink are all held in the Belle Isle Casino… which apparently hasn’t been updated since the first year of the race. It is no longer really a casino, just a building with two floors and various rooms. It if truly was an active casino at one time, it was certainly small compared to modern day casinos such as Motor City or the MGM. According to the article below it was at one time an operational casino.

Wikipedia entry on Belle Isle.

An article published by the Friends of Belle Isle which lists the attractions of the island.

It is actually a nice place to visit during the summer, although as most venues in Detroit, it may not the the safest place to be on a hot summer night. The various attractions on the island unfortunately show their age, and also reflect the current financial situation of the city of Detroit.

One comment on the casino, the referenced article mentions the casino was built to take advantage of the cooling breezes before air conditioning was invented… well that certainly is true! This year, as last year, the weather was chilly, wet and with a brisk river breeze!

“The 2009 Belle Isle New Years Eve 4 Mile race Photo Album is complete!”

The official bib number.
The Holiday Hustle 5K 2009 bib.

The days activities include a one mile run, a four mile run/walk and a four mile race. I am always impressed by some of the one milers, mainly kids under 12 (I think) some run some pretty good times. There are pictures available for purchase, which you don’t have to do, but there are a lot of good shots taken of the race you might like to see, including the kids run. These include some of a friend that ran the race, but not me… but I have my own photographer(s).

This also has to be one of the flattest races you could imagine. The island can’t vary more than a few feet in altitude at any point. The “adjusted” track from the Garmin FR 305. The track is adjusted in SportsTrack software by updating the gps points against an official topographical map with the altitude.

The course.

.

As was mentioned race day was wet and blustery! Earlier in the afternoon it was still fairly nice, not sunny but at least warmer and drier. Just before race time a light drizzle started and that seemed to cool everything down rapidly. Nothing like last year’s conditions though!

The race grew quite a bit since last year with about 400 more runners registered this . Maybe because the race is seeing a little more advertising and publicity. Last year I only heard about it by noticing a flyer at the Detroit Turkey Trot race. No web site was found on it, maybe a few of the running web sites listed it, but in general it was a secret race. This year it was on several of the news channels the day before, and can be found via Google or other search engines. Also, and I think a BIG plus is this year had online registration! Prior years required a paper entry from be completed and mailed in, then either verified via email or trusting they got it and you just showed up and hoped your packet was ready. There is no early packet pick up, everything is done the day off the race. Notice to late comers… you can register right then fairly painlessly if you suddenly decided to come out and freeze your tuskus with the rest of the crazies.

Last year they gave each participant a wooden plaque, this year was a medal.
..

The online stats listing was published pretty quickly after the race.
The official final stats.

    • …. and this breaks down into these numbers for the race:
    • a) 4 Miles
    • b) finished 338 out of 813 overall in the 4 mile. (Top 41.5%)
    • c) finished 10 out of 30 in my age group – M60-64. (33.3%)
    • d) finished ? out of ? men. (No data given)
    • e) had a 8:50 pace, and a 35:18.8 total chip time.
    • f)

You can see the full details on the running stats web page.(Index) or this specific race.

    h) had a great time – which is always the goal right?… Right!

Until the final resolution is kept,

George

Creating a Custom POI file for Garmin GPS

I travel quite a bit for work, and find using a GPS to get me to all the different places I need to go is almost a necessity. There are also vacations with many places that we have never been to before. The days of carrying state maps in the glove compartment (Dating myself – but can you remember when you could get all the maps you wanted free at any gas station?) or an atlas in the trunk are over for me. Even the “high tech” method of using a mapping program to find a location, develop the route to the destination and then printing a map out are past their prime.

To get around to all these places with the least fuss I create different custom POI files for the Garmin Nuvi 755T that I received as a present. I would imagine the method I am going to detail on creating and uploading a custom POI file would apply to other models also.

First you need five things:

  • A Garmin GPS
  • Garmin POI loader software
  • A USB cable
  • ITN Converter software
  • An internet connection to download and use the ITN software.

First download the ITN software from https://benichougps.blogspot.com/
(Note: Clicking on any of the following pictures will enlarge (most of) them to allow you to see detail better.

Creating a custom POI file for a Garmin.GPS.

You may do better if you convert the page to English, although it is not really necessary.
Creating a custom POI file for a Garmin.GPS.

Click on the “Downloads” hyperlink.
Creating a custom POI file for a Garmin.GPS.

Follow the prompts to install the software to your PC. Once done you will have an icon like the following on your desktop.
Creating a custom POI file for a Garmin.GPS.

Once it is installed click on the icon to open the software. Then click on the “Editor” button in the lower right hand side.
Creating a custom POI file for a Garmin.GPS.

It will launch the program and open a link which displays Google Maps in a pane along with the program.
Creating a custom POI file for a Garmin.GPS.

Now the fun part starts! Where do you want to go?

Now the fun part starts! Where do you want to go? Type in a search string that gives you the results you want. (1) It can be an address or the name of a place. Here I wanted to find “Cobo Hall” in downtown Detroit Michigan since I was going to run a 10K “Turkey Trot” race there. Click the “Search Icon” (2). Now you have to pick the best match for where you want to go. I like to turn on the satellite view, (4) and zoom in so I can see the object fairly well. (5)

Creating a custom POI file for a Garmin.GPS. It may take a littel sleuthing to make sure you have the correct location. You can use the address that comes up and Google it to verify the address is the place you want. I often go to the Google Maps page and search there since it gives more detail on the place located. Once you are sure you have the correct location showing you can edit the name. (6) This name will later show in your GPS so you want it short and meaningful to you. Once you edit the name click on “OK”, then remember to click on “Add to itinerary” to save it to your list. (8)

TIP: You can click on the map to add a “pin” for the exact location you want.

TIP: You can click on the map to add a “pin” for the exact location you want. I like to do this so I can define a specific place I want to go such as a certain parking lot at a large park, or even the entrance or exit of a large building that I want to be closest to. Just add the pin then name it like above.

You should see it appear in your list of saved places (9)
In the file give your new file a name. (10) This name will later show in your GPS as the “Custom POI” file name. Again, you will want to give it a meaningful name.
Creating a custom POI file for a Garmin.GPS.

TIP:Organize your files!

TIP: I start all my file names with a series of numbers like 01, 02, 03, etc. This is because later the GPS will order the custom POI files in your GPS in this same order. I like to put the most commonly used ones first in the list to avoid a little bit of scrolling. You can always change the numbers later to add a file or rearrange them if you like.
Creating a custom POI file for a Garmin.GPS.

Repeat the above steps until you have as many waypoints as you want in your file. You can always come back and add more later if you want.
Once you have added all the points you want in this file, click on the X to close the editor.
Creating a custom POI file for a Garmin.GPS.

Once you close the editor it will automatically add the new locations to the file page.
Creating a custom POI file for a Garmin.GPS.
Now you are ready to save your file for later use. At the bottom of the window select “CVS” as a file type. (12) Then click on “Export”. (13)

When you click on export a file explorer opens, pick where you want to save your file, and the name you want it saved by. It will use the name you entered earlier by default but you can change it here if you like. Here I have added the “16” to the file name for later ordering of the files. Another tip is to use either the number of places contained in the file, or the date… or both as shown here. The number of entries in the file lets me know which “revision” it is if I edit the same file multiple times in a day.

That’s all there is to creating your first custom POI file! The ITN software makes this so easy to do I frequently go back in an add even one or two points to a given file. It’s easier than typing in an address in the GPS unit, and probably more accurate.

Now that you have a file what do you do with it? Come back in a week when I go through the details of how to best load the new custom POI’s into your unit.

Until the final POI is defined,
George

Holiday Hustle 5K – 2009 Dexter Michigan

This weekend was the Dexter Michigan “Holiday Hustle” put on by Running Fit. (The local running supplies store here in Ann Arbor.) A nice brisk day of 28 degrees greeted the runners and kept everyone from getting overheated. Starting right in the  center of downtown at the gazebo the couse then winds through some of the nearby housing additions and loops back on itself to the finish line. A few short but steep hills on the way, but they are short enough as to not present that much of a challenge.

This year the race had over 1200 entries, (and finishers) while last years results list only 658 finishers, so it is rapidly growing in popularity. I got out pretty strong and avoided the real crush of traffic and managed an 8 minute first mile. (Way to fast for me, but since it was only a 5K managed to hang on to the end anyway.) The overall time of 26:32 is a new PR by about 16 seconds over the 2009 spring race. May have to start doing a little more (some, any) speed training if I want to keep getting PR’s at this distance.

Lots of people dressed up for the event, including Santa’s, Mrs Santa’s, lots of reindeer and one very complete Christmas tree! The race did sort of go to the dogs, since there hey were more people running with their pets than any other race I remember. Maybe since it is shorter and also was very cool they thought the dogs could handle it better. The pets didn’t cause any problems that I saw anyway, unlike the runner who stopped short right at the starting line to retrieve a glove she dropped causing a lot of evasive maneuvering on the part of the people behind her trying to break out of the starting gate!

The usual photography team accompanied me to the race and took a lot of excellent photos before, during and after the race.

“The Holiday Hustle 5K 2009 Photo Album is complete!”

The official bib number.
The Holiday Hustle 5K 2009 bib.

The start of the race, off like a herd of turtles!

.

The race almost doubled in size since last year, with over 1200 runners.

…. and I made it to the finish.
.

Some results, sixth out of 18 in my age group.

The official final stats.

The official final stats.

    • …. and this breaks down into these numbers for the race:


    • a) 5 kilometers = 3.1 Miles


    • b) finished 402 out of 1237 overall in the 5K. (Top 32.5%)


    • c) finished 6 out of 18 in my age group – M60-64. (33.3%)


    • d) finished 249 out of 483 men. (51.5%)


    • e) had a 8:30 pace, 26:23 total chip time.


    • f)

You can see the full details on the running stats web page.

    h) had a great time – which is always the goal right?… Right!

Until “The Hustle” becomes a Waltz,

George